|
|
|
||||||||
|
|
|
||||||||
Bolting them in
Installing Miata Seats in a Spitfire |
| The Iinitial Trial Fit and Comparison The Mechanical Mounting The Results |
| aahhh... the fun stuff begins. Now how do I want to do this.... let's
see... After three or four more temporary trail fittings, I decided I was going to use all the original mount holes and bolts from the Spitfire. So I needed to figure out where to drill holes in the feet of the Miata seat mounts. I first removed the runners from the bottoms of the seats and hammered all the feet flat, parallel to the runners. I then Dremel tooled (cut off) the big pins, leaving the bases of the pins as big rivets to maintain mount integrity. After the feet where flat, I set about deciding where holes needed to be drilled through the now flattened out Miata Seat mounts. Once again.... a lowly Dremel Tool came to the rescue. The Dremel (with a carbide cut-off wheel) made quick work of putting mount holes where needed in the now very weird shaped, flattened out, Miata slide feet. To clear the tunnel floor and still fit the front mount, started off by trimming off the slide foot that would be at the rear, nearest the center tunnel to all clearance as desired. |
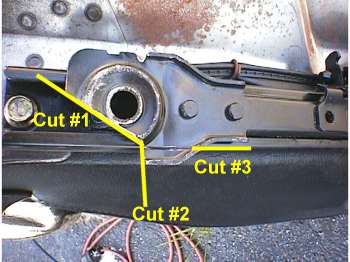
Three cuts to reduce foot size (cut to fit)
| Cut #1 follows the floor/tunnel line. Cut#2 simply runs in across the
folded up lip and up the circular 'foot'. Cut #3 parallels the edge of the slide rail. So
now the line at Cut#3 is tight up against the side of the tunnel.
|
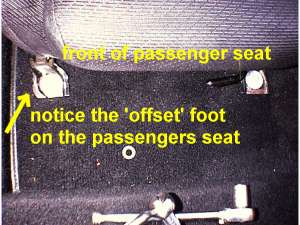
| Do to the slight offset front foot and the size of the front holes in the
Miata Seat mounts, I was able to use the original front mount bolts and holes. Under the
seat foot on the carpet, is the original washer, with one large fender washer on top that.
A large fender washer is used on top the foot as well. A Little wiggling of the seat, and
both bolts went in without any mod's to the front at all. To get the seat slid back this far (photo above) to fasten the front bolts, the back of the seat had to be lifted above the kneewall behind the seat to get the seat far enough back to get at these two front mounts. Once the front bolts were in place, (just enough to keep the runners from moving) the seat was moved forward to mark the rear mount holes needed.
|
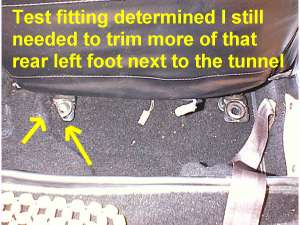
| Here's a trick To accurately mark the rear bolt locations on the feet, I used a scratch awl, stuck up through the original floor bolt hole, and scribed a circle through the carpet, onto the bottom of the seat feet. |
| So again, out comes the seat for the drilling. While it was out for the last time, I trimmed the tunnel side hinge cover (plastic) with a pair of tin snips |
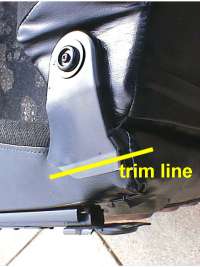
Trimmed for clearance (YMMV)
You may need to... you may not.
| I used the Dremel tool to cut the holes for the rear mount feet as the position needed, made it nearly impossible to properly get a drill bit to bite and drill cleanly through such a convoluted surface. |
.... images and more text to come .....
©
All material copyright© Teglerizer 1996-2024last edited 02/22/10

