|
|
|
||||||||
|
|
|
||||||||
|
Electric window Kit Installation
| The first kit I purchased from
Autoloc was suppose to
fit an MGB. Yeah right! The drive dogs weren't even close to the octagon shaped window
crank we have. But the design of the system was superb. I wish I could have used it.
Please at least check out the system. With a little adaptation, you could use this system
and it might fill your desires. But I wanted it 'off-the-shelf' , I didn't want to have to
mess with modifications. I ended up buying the VB's catalog advertised brand. VB was selling them on 'close-out' so I bought them at the drastically reduced price ($200 cheaper than normal).They really surprised me, they are very well made! The instructions were in full vivid laser printer color, precise and easy to follow. There wasn't any template as the instructions suggested but I didn't really need it. You have to drill a few holes but line up was very easy to figure out. .
|
... photos to come.... |
... photos to come.... |
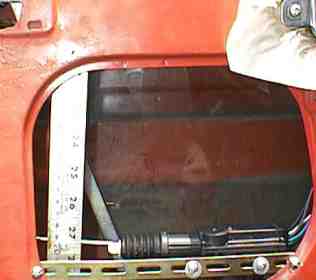
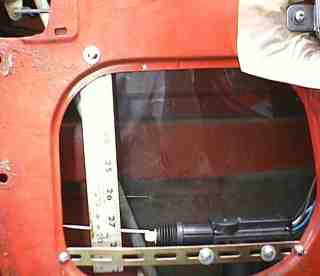
This system is elegant enough to use the original window crank holes to mount the electric
switch pods over. Since the crank knob is completely removed, it covers the holes, and
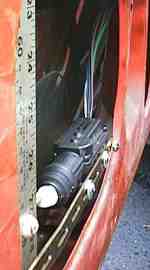
passes the wires through this same hole ( no new holes to cut out) . Since this mechanism is 100% internal to the door, you have to remove the old window lift workings from inside the door. This was my initial reason for not selecting these windows in the first place. Nothing performed here limits you from easily returning the door and window mechanism to its previously hand cranked state. (BUT WHY WOULD YOU!) This was a very convenient time to change the outer waist seals on the windows,... while the glass was out of the door. |
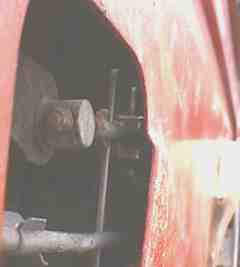
| The installation of the switches and wires took longer than the hardware lift mechanisms. Trying to decide how and where I wanted to route the wires through the door jams was a problem. I found the slits behind the kick boards pass through to the door hinge area after rounding the metal lip. I was able to pass all the wires, one at a time, through this slit from under the dash at the edge of the kick board and pull it through into the hinge area. I used a screw driver to slightly flatten out or bend back the metal where the hinge bar passes into the door body. After slipping the wires through from the hinge area, I pulled the wires out through the mount screw access hole. Now that the wires were in the door behind the door trim panel, I simply ran the wires down through the window crank hole and plugged in the motors and switches. A few tie-wraps make sure the wiring stays clear of any moving parts. | ... photos to come.... |
... photos to come.... |
The lift mechanisms
are very quick and quiet! The fuse supplied is a 15 amp spade lug flat plug in type.
I replaced it with an in-line glass original style fuse holder so all the fuses on this
vehicle would be the same type. Tests, even when operating both window under strain (a hand on the window holding it back) each window would only drew around 6.5 amps. Remember too, that this is only a very intermittent load on your electrical system. Best of all, I now have them tied to a sensor in my alarm system. If if rains, the windows go up automatically. |
![]()
Electric Door locks Installation
 locked (electrics extended)
|
 unlocked (electrics retracked)
|
||
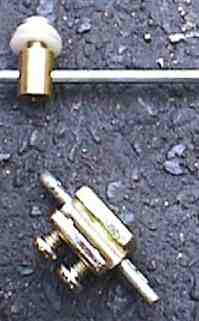
 stop block, pin, and lock lever arm assembled
|
 the fingers of the lock lever arm span the stop block clamped to original lock rod |
|
|
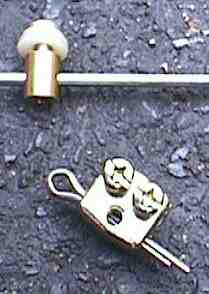
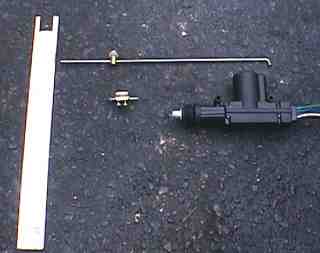 lock lever arm, lock pushrod, stop block, and electric activator
|
 |
 |
|
... photos to come.... |
|||
... photos to come.... |
|||
![]()
|
Well, this is one area I'm not going to explain in detail. The manufacturer and type of
alarm here aren't the important issue. The fact OB has a good quality alarm is. The Keyless entry power door locks were installed because I hate using that tiny key for the doors. I guess I've been spoiled by other vehicles. When the engine starts, the doors lock automatically. When you shut it off, they unlock automatically. Using a key on the door will unlock both doors simultaneously. |
The power windows can be (
but aren't on OB) tied to the alarm as well. When you use the key
fob to turn on the alarm, it locks the doors, puts up the windows, and turns on the
multi-stage alarm. Two levels of warn away, as well as full alarm on break in. Parking light flashes as well as chirps indicate the state of the alarm set. It has ignition kill bypass, hydraulic brake hold, and secondary system remote. The two stage parameter motion detector is extremely sensitive, but I haven't had any false trips yet. |
![]()
last edited 05/13/2009
accesses to date