|
|
|
||||||||
|
|
|
||||||||
Emissions and Cranckcase Ventilation Issues |
|||||
|
|||||
|
| Well after the success with the oil removal from the intake sctream, via the upper filter on Big Red (first 5 emissions experiments) I decided to add an oil separator to my 1967 Spitfire MKIII. But how do I do it? Cleanly and cheaply? I needed a container that can be opened up to change filter material as needed, and a way to let the collected oil if any, drain back to the crankcase. |
|
|
|
So off
to the hardware store I go, in search of a something I can use. It had to
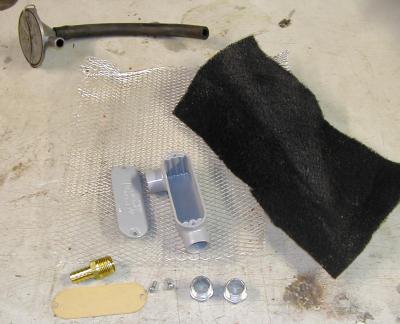
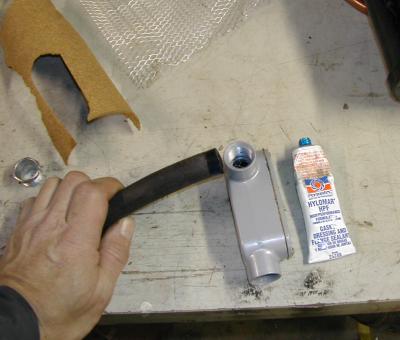
be air tight, with a removable lid and small. I ended up with one of those outdoor electrical conduit connection boxes. It has a screw on lid, with two ports in the directions I needed them. I also grabbed a few adapters for smaller pipe sizes to thread into the box, as well as another brass screw in barbed hose adapter. The black stuff and the screen is the remainder of the filter stove hood vent filter, left over from the first vacuum canister build, currently in Big Red (Breather Systems #5) An original PCV valve is at the upper left in this photo. |
|
I cut out a piece of the screen to stuff in the box to keep the filter wad from getting sucked into the intake. I realized now, after getting everything home, that I didn't need the hose adapters at all. A 1/2"id. hose, threads into the box nearly perfectly. Then when you stuff the rocker cover vent pipe in, it wedges even tighter. So to with the port of the PCV valve as you'll see in the next pictures. |
 |
After installing the screen I simply cut out a section of the filter
material, rolled it up into a log, and stuffed it down into the box. You
need to make sure you gewt it into the corners so air doesn't simply
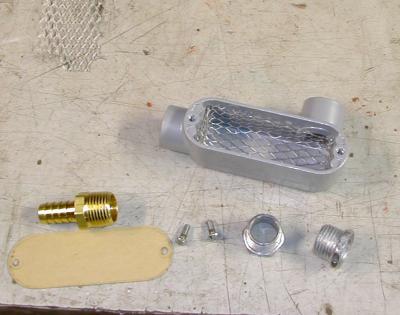
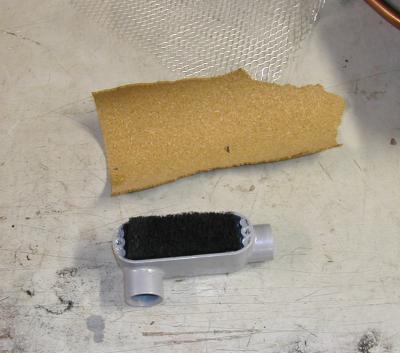
bypass the filter media along the walls. The box came with a paper seal, but I thought cork would work better to seal with a vacuum applied. So Iused the lid to 'template' the two holes for the cover screws. I laid in a bigger than needed sheet, screwed on the lid, then trimmed the cork to fit. I then popped it back open, and laid on a layer of Blue Hylomar just to make sure I'd maintain a good air tight seal. |
 |
AS I mentioned before, the
adapters weren't even needed. the 1/2" diameter hose screws in rather
snugly to the ports of the box. (Oh, the box is 'on-the-shelf' as a
1/2" conduit box. There are metal AND plastic ones. Buy the metal
one) I applied a light coat of Hylomar t othe threads and on the
hose. Screwe dthe hose in, then cut it to length as desired. |
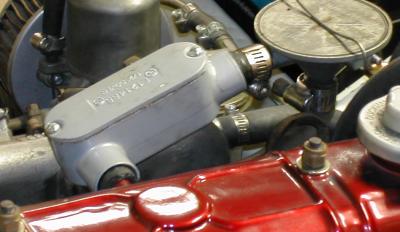 |
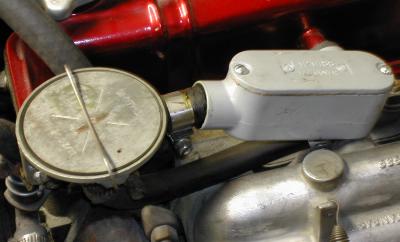
I mounted the filter at
an angle, so any oil that collects, can simply drain back down into the
rocker cover. I literally just wiggled the box back and forth until
the hose was jammed on tight to the rocker cover port. |
|
The bracket is a simple L
shaped piece of metal, bolted to the tab on the PCV valve, and hose
clamped to the passenger compartment heater core feed hose. We'll see how this works when I get it out on the road when the snow melts here. |
Emissions and Cranckcase Ventilation Issues |
|||||
|
|||||
|
![]()
©1987-2010
All material copyright© Teglerizer 1996-2008last edited
3/15/08

hits since last reset


index