|
|
|
||||||||
|
|
|
||||||||
Whitey - 1975 Spitfire Specific Tasks and Procedures |
||||||
|
||||||
|
|
What a shocking difference! In the early seventies the Triumph Spitfire almost didn't make it into the U.S. due to headlight height requirements. The lights were below the minimum specification for U.S. road cars by a measly 1.0". How did Triumph get around this. They stuffed stiffer longer springs up front to raise the nose. So what effect did this have? Well in my opinion, it nearly destroyed the handling characteristics of this gem of a roadster. So what did I do about it? I installed a pair of 214144 road springs (designed for an earlier MKIII) up front. What did this do? Gave me back the phenomenal handling and stability Spitfires were world renowned for. The 214144 early spring is rated at 150lbs rather than the later TKC1884 being rated at 180lbs. It's interesting that the shorter 214144 spring has one more coil (12 total) than the longer TKC1884 spring (11). I'd swear, both springs are using the same gauge wire. I'd say any difference I could measure was the paint only.
|
|
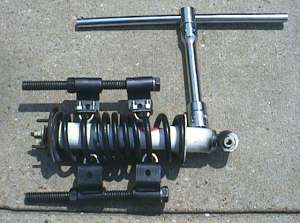 |
The spring compressor I used was designed for McPherson struts. I liked the design since it bolts solidly to the spring. The big T-handle is my 1" drive socket set. |
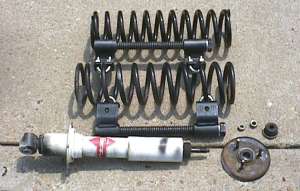 |
Just a shot of the original spring, off the shock uncompressed but the tool still attached. The extra spring (no tool) is the 214144 spring. |
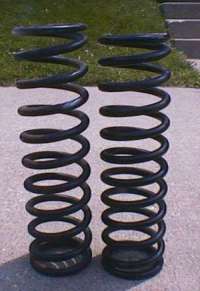
| Wow! look at the differences in these springs. In the photo at the right, the left spring is the original on the car. (11 coils) The spring at the right is the 214144 designated spring (12 coils). The 214144 spring is nearly 3/4"-1" shorter, but has one more coil than the taller spring. HHmm.. the wire gauge of the spring seems to be identical? |
|
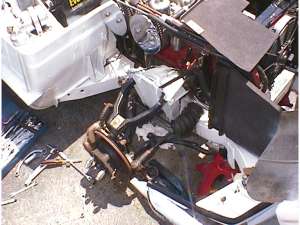 |
With everything off, I finished cleaning up the suspension mount area and repainted everything here. The suspension arms will get the same treatment when I replace all the bushings and rebuild the lower front trunnions. |
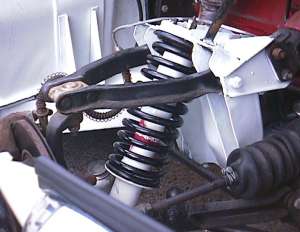 |
The re-assembled new spring and shock back in place before being lowered back onto the ground. |
|
Previous to this conversion, I had added nearly 5 spacers behind each lower a-arm chassis
mount, trying to get the camber set correctly (with the old springs). The upper
a-arm was nearly horizontal and level with the ground with the old spring.
|
|
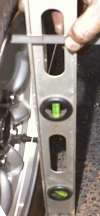 |
How do I measure camber? Easy! Take a level, stand it up next to the tire and hold it so the bubble is level. Take a small ruler and measure the distance to the top and bottom edges of the rim. Calculate the angle across the 13" or so inch diameter of the tire and you have your camber angle. |
| So how do I measure front
and rear end alignment? Almost the same 'make-shift' way. But then I check it with
another tool when done. With my jack stands I run a string parallel to the car. You can either find the center line of the car and measure out, or simply measure from the center of each wheel to set the strings. I measure from the center of the wheel hub out to the string, and set the stands so the string is the same distance from the front and rear wheel centers on each side of the car. (remember... the rear track is one inch wider in the rear of a 1500 series) Now from the string you can measure the front and rear edges of the wheel rims to check alignment. This way at least the wheels will track straight behind each other down the road. I also have one of those long wheel alignment calipers that spans the wheel widths and give you a direct measurement of toe-in/toe-out. I use it just to double check my guesti-measurements.
|
|
|
|
 |
I ended up letting ALL the air out of the rear air shocks, to bring the rear end back down to match the front. The rear now has a the somewhat proper negative chamber as designed. The front axle centerline to bonnet lip measurement went from 13.5" to 12". I also now have the spec. 4.4" ground clearance as stipulated in the books. |
|
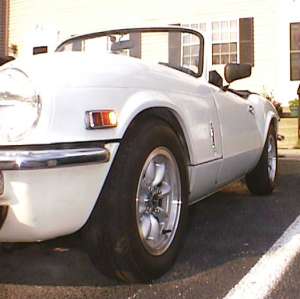
So, what did this really do to the handling of the car? Phenomenal difference! Around corners, there is absolutely NO wandering or darting. Crossing the apex is extremely predictable. There is literally no wondering or 'circular bounce' when traversing bumps in a turn. The tracking on the highway was mind boggling! I simply can't believe the transformation in handling. I took it up to nearly 80mph on the highway, and it was extremely stable and straight. Absolutely no twitchiness to the steering at speed. Also surprising, these new spring do not seem the least bit stiffer or softer than the originals. The 'attitude' (front to rear heights) of the car makes your butt feel a bit more comfortable in the seat as well. No more looking 'over' the bonnet. I now look 'down' the bonnet at the road in front of me. I'm in love all over again. :-) |
|
©1987-2010
All material copyright© Teglerizer 1996-2008last edited
3/15/08

hits since last reset